Time Tracker
Making sure your business is profitable is critically important, so knowing how long your employees are spending on each project or task is vital to be able to guarantee profitability.
The Jarmit Time Tracker application allows your employees to quickly input their hours spend on each project or task, make corrections, and even go back to previous days to add or modify their entries.
It wouldn’t be good if registering the hours you work took a long time in itself, that’s why the Jarmit Time Tracker has been optimized to ensure it takes as little time as possible to enter the details of what you’ve been working on.
To help with analyzing the data gathered by the application, a ‘motive’ dropdown allows the user to pick from a number of different options which an application manager has previously added for their department.
These ‘motives’ can be typical tasks performed in each department or a different concept, such as project number or client name, if desired.
Additional ‘motives’ can include reasons why an employee wasn’t working, for example ‘attending a teacher-parent meeting’, ‘appointment with doctor or dentist’, etc.
Whether you decide to define several reasons for not working or have just one ‘not working’ and let the user add the details for themselves, the Jarmit Time Tracker has an optional setting to allow files to be attached to each registry as proof of the user’s time not working. This could be a proof of appointment, doctor’s certificate, etc. making it easy for the human resources department to control time taken off.
Apart from setting the list of motives for each department, the application administrators can manage which other users are app administrators and access the data, which can be easily exported to Excel for analysis.
Multilingual support: English and Spanish
The Property pane
The Jarmit Time Tracker property pane has two sections: global settings and license settings.
Global Settings
There are two possible setting to configure for the Jarmit Time Tracker.
The ‘Number of days previous users can edit hours’ is used to limit how long ago the application users can modify their entries. It can be set from 0 which means no limit is applied, up to 100 days.
If you need a higher limit, get in touch, and we can prepare you a special version of the application to meet your needs.
The other setting is a toggle to allow or not files to be attached to entries. This can be used as proof of absence or for any other purpose such as work reports.
License Settings
Finally, the licensing section of the property pane allows you to add your license code, which we send you after purchasing.
The ‘Apply’ button at the bottom saves your web part configuration.
The User Interface
The Jarmit Time Tracker automatically opens on today’s date. If a user wishes to view, add or modify an entry to another day, they select the day in the calendar on the left-hand side.
To add a new entry, select the motive from the dropdown, add the detail and the number of hours spent. Hours are specified in decimal format (e.g. 2.25 would be 2 hours 15 minutes) and can have up to two decimal places. All fields are required.
To modify an entry, click on the motive, detail or hours to change their values. If an entry has been made in the wrong date, clicking on the date allows you to move the entry to another day.
If the entry is outside the range of editable days set in the property pane, you cannot edit it. Moving an entry to a date outside the editable range will cause an error message will be displayed.
Once an entry has been added, if attached files has been activated, you can drag-n-drop the file onto the dotted rectangle with the upload icon to attach it.
Any attached files can be opened in a new tab by clicking on the green ‘view’ button, and removed by clicking on the red ‘delete’ button.
Entire entries can be removed by clicking the red ‘delete’ button at the end of the entry.
The language will be automatically set to the current SharePoint language, defaulting to English if not supported. If you need the Jarmit Time Tracker in another language, please let us know and we will add it.
How it works
The Jarmit Time Tracker SharePoint Lists
When you add the Jarmit Time Tracker application to a SharePoint page for the first time, it creates three special lists in the same SharePoint site only the application administrators have access to:
- Administrators list
- Motives by Department list
- Hours entries list
The user who adds the web part to the page automatically is added to the Administrators list and becomes its first administrator.
Administrators of the application can access these lists via the special Administrator Links section, which only appears to users in the Administrators list.
If you add the Jarmit Time Tracker application to another page in the same SharePoint site, it will use the lists that have already been created.
To have distinct instances of the Jarmit Time Tracker (to limit access to the data, for example) you need to add the Jarmit Time Tracker application to a page in a different SharePoint site or subsite.
The administrators list
This list is very simple and has only one important column ‘Administrator’ where you add other users who will also have access to the links to the application lists.
To avoid other users changing this list, you can modify its permissions to restrict edit access to the administrators you have added. All other users must have read permissions.
The motives by department list
In this list, you can define which options for the ‘motives’ dropdown will appear for each user based on the department they belong to.
The department names are the same as defined in the user’s profiles. If you are a SharePoint or Global administrator, you can review and modify user profiles at this URL: https://your-tenant-admin.sharepoint.com/_layouts/15/TenantProfileAdmin/ManageUserProfileServiceApplication.aspx
Editing this list in grid view will allow you to quickly copy department names to multiple rows.
The hours entries list
The Hours entries list is where the really important data is stored. As this data may contain sensitive personal information, users can only see and edit their own entries.
For an application administrator to be able to see entries from all the users, in the permissions section of the settings for the ‘Jarmit Time Tracker Hours’ list, break inheritance and add the application administrators who require full access with ‘Full Control’ permission.
While the Jarmit Time Tracker application has no limit on the amount of data which can be stored in this list, the data is stored in several layers of subfolders to enable viewing with the standard SharePoint interface up to it’s maximum capacity (5,000 rows in a view).
The hours are stored by year, month, day, department and finally user (identified by email address to avoid problems with users sharing the same name).
As this is a standard SharePoint list, you can easily export the data to Excel from the list itself or using Power Query in Excel for further analysis.
Customization
While our apps are as generic as possible to suit most needs, you may need something special to fit what you require.
Maybe it’s an extra field in the hours entries for project number or client name. Whatever it is, we can customize our applications to do exactly what you need them to do. Tell us what you need and we can do it.
Installation instructions
Fill out the registration form below and click the button to download a zip file containing the .sppkg SPFx solution file.
This solution will only work in SharePoint Online. If you are interested in a version for SharePoint 2016/2019/Subscription Edition, please let us know.
If you wish to deploy this solution to your entire SharePoint Online environment, you need to add this solution to your tenant app catalog.
To do this, you must be a SharePoint Administrator or a Global Administrator.
If you do not yet have a tenant app catalog (usually created at the URL https://your-tenant.sharepoint.com/sites/appcatalog) you can create one easily.
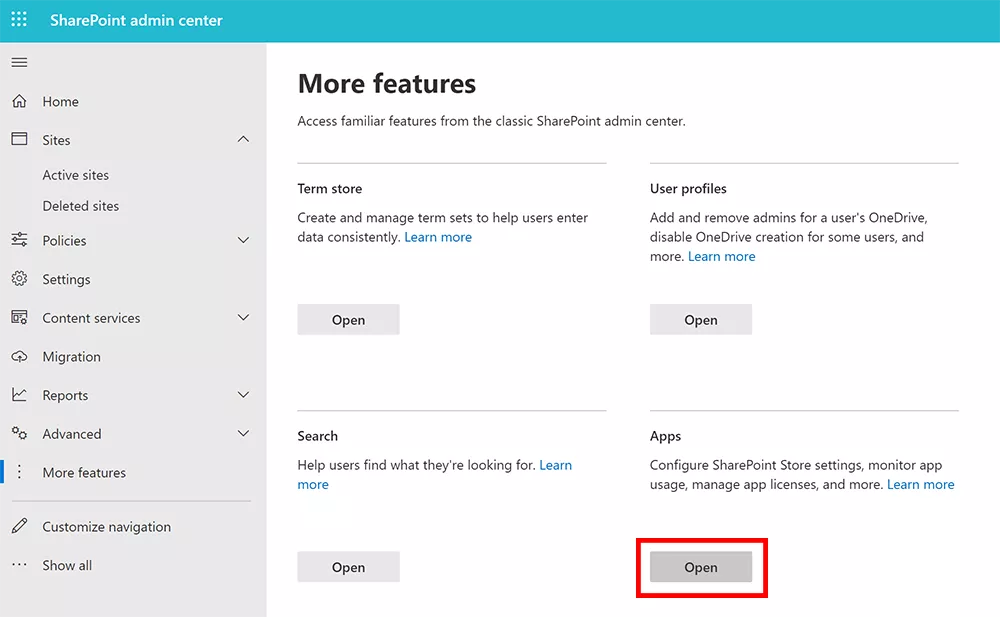
- Open your SharePoint administration site (https://your-tenant-admin.sharepoint.com/)
- In the left sidebar, select ‘More features’
- Then locate the section ‘Apps’ and select ‘Open’.
This will start the automatic creation of the tenant app catalog if it does not exist.
You can also install this solution in a site level app catalog if you only want it to be available in specific SharePoint sites.
For more information on how to create site collection app catalogs and how to use them, please read this Microsoft article.
When you add the .sppkg file to the app catalog, you will see a deployment dialog. To make the Jarmit Time Tracker web part directly available to all SharePoint sites, you can check the ‘Make this solution available to all sites in the organization’ setting.
If you don’t check the ‘Make this solution available to all sites in the organization’ setting during deployment, you can add the web part to individual SharePoint sites by going to the site contents page, and select New -> App.
The new modern experience will show a list of solutions you can add to the site. Click the ‘Add’ button underneath the Jarmit Time Tracker solution.
It will take a few seconds for SharePoint to add the web part to the site. Once it appears in the site contents page, you can add it to a SharePoint page.
While editing a SharePoint page, you can find the Jarmit Time Tracker web part in the toolbox in the ‘Advanced’ section.
When you add the web part to a page, you start a 14 day fully functional trial period. After 14 days, the web part will cease to work and display a ‘trial finished’ message.
After purchasing a license, you can edit the page, open the web part property pane and copy the license code into the text box to activate the license. Your current web part configuration will not be affected.
Pricing
(<50 employees)
- Unlimited use in 1 Microsoft 365 tenant
- Installation and 1st configuration included
- Free updates
- Email support
- 1 free lifetime subscription to 365Desk.io
(50-499 employees)
- Unlimited use in up to 2 Microsoft 365 tenants owned by the business
- Installation and 1st configuration included
- Free updates
- Email support
- 1 free lifetime subscription to 365Desk.io
(>500 employees)
- Unlimited use in up to 5 Microsoft 365 tenants owned by the business
- Installation and 1st configuration included
- Free updates
- Email support
- 1 free lifetime subscription to 365Desk.io
Registration Form
To download the Jarmit Time Tracker application, please fill out the following form.
Use your Microsoft 365 email to register and receive 1 free lifetime subscription to 365Desk.io (limit 1 per Microsoft 365 tenant).